
Collection of information I use to study for the CAD certification.
The Exam
Listing of which topics appear to what percentage in the exam:
| Domain | Topics / Subtopics | Percent |
|---|---|---|
| 1 | Designing and Creating an Application
| 20% |
| 2 | Application User Interface
| 20% |
| 3 | Security and Restricting Access
| 20% |
| 4 | Application Automation
| 20% |
| 5 | Working with External Data
| 10% |
| 6 | Managing Applications
| 10% |
Topics
Designing and Creating an Application
Determine if an application is a good fit for ServiceNow
Good fit
If an application has one of those characteristics it is (usually) a good fit for the ServiceNow Platform.
- Simple forms
- Task management
- Request fulfillment
- Excel driven processes
- Repeatable processes
- 3rd party integrations
- Orchestration of multiple systems
- Single experience from functions in multiple systems
- Web and Mobile access to the same apps and data simultaneously
Bad fit
- Unstructed data
- Unrepeatable processes
- Requires graphics processing
- Streaming audio or video
- Highly customized UI
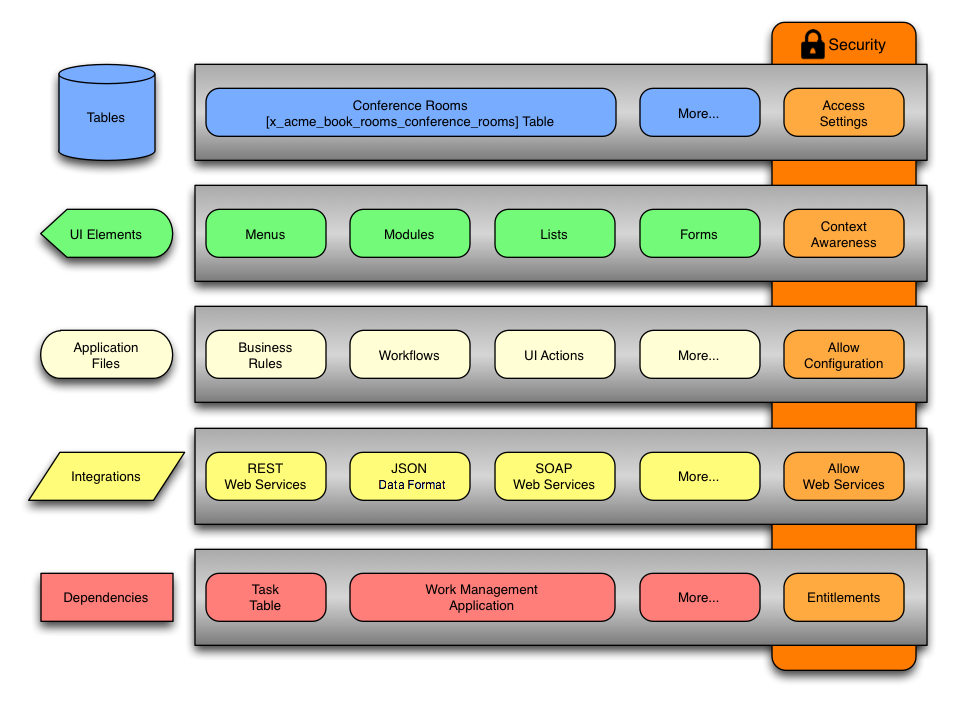
Anatomy of application
Visual representation of the different components and applications consists of:
Creating application
Menu: System Applications > Studio > (Click on "Create Application") Other Option: System Applications > My Company Applications > (Click on "Create new")
Guided Application Creator / Guided App Creator
Guides you through the creation process of a Scoped Application.
Roles
Roles allowing to use Guided App Creator
- sn_g_app_creator.app_creator: Allows to create applications with private scope
- sn_g_app_creator.global: Allows to create applications in global scope
System Properties
- sn_g_app_creator.allow_global: Allows all users with
sn_g_app_creator.app_creatorrole to creat applications in the global scope
Panes
- Info Pane
- Application Details
- Name: Your applications name
- Description: Your applications description
- Advanced Settings:
- Scoped: Private scope (namespace) for your code
- Global: "Bucket" for custom code in Global scope (namespace)
- Scope: Unique identifier for the application, limited to 18 characters (Value is automatically populated)
- Roles
- Roles: select an existing role to restrict access to an application. Only users with the role can access the application.
- Or use "Creat new Role" to create a new role for the application
- Application Formats
- Mobile: Supports users who work from mobile device
- Classic: Supports users who work via lists and forms
- Application Details
- Data Pane
- Creating Tables
- You can select an existing table or create a new table
- Creating a new Table
- Upload spreadsheet: Use a .XLSX spreadsheet to add fields to a table
- Extend a table: Start from an existing ServiceNow table and add fields
- Create table from scratch: Define table fields
- Manage Access: Grant access to tables by role and set role permissions
- Creating Tables
- Design Pane
- Here you can adjust the prefilled values which will be created into Application Menu and Module(s)
Design and implement a data model
Menu: System Definition > Tables
Creating a table
Described in this document are the licensing limitations when creating custom tables: ServiceNow - Custom Table Guide
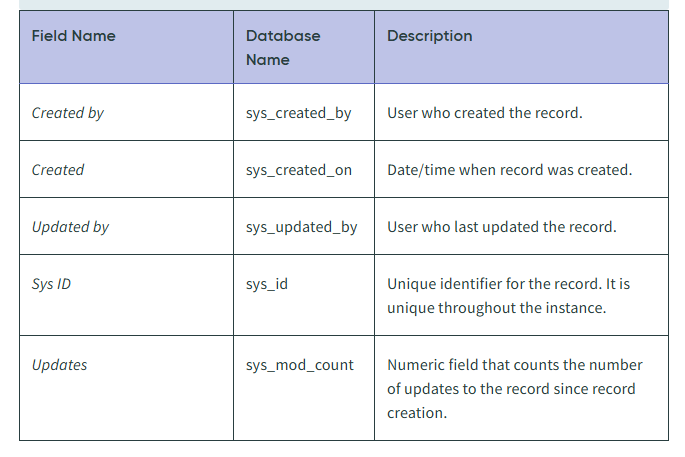
Creating a table (Default Fields)
ServiceNow automatically adds the following fields when a table is created:
Creating a table (Configuration Options)
When creating a table you have the following options:
Extensible: Can table be extended? (Used in child table, in field "Extends table")Extends table: When table should extend from other table (e.g. task, cmdb_ci)Create access controls: If checked will create access controls (ACLs). This must be selected for Scoped ApplicationsUser role: Creates a role to access tableCreate module: Creates ModuleCreate mobile module: Creates Module for MobileAdd module to menu: Add to existing Menu "point", or create newNew menu name: If "create new" selected you can enter a new menu name here
Extend or not?
| Criteria | Extend |
|---|---|
| A table exists with fields similar to what is needed | Yes |
| No similar table exists | No |
| Table will contain sample or seeded data that is used only for reference by the application | No |
| The scripts and workflow for an existing table are useful for the application | Yes |
| You prefer to script the application logic yourself and not inherit logic | No |
| You want to use the approval workflow activities (must extend the Task table for all approval activities except the User Approval activity) | Yes |
Conclusion: If a developer creates a new table from scratch they have complete control over the table's columns and the business logic. For example for reference data to associate to in another table, or for processes that are dissimilar from pre-existing tables and business logic contained on those tables.
Create modules
They can be automatically created when a table is created (see above). Or manually with more configuration options as described below.
Application Menu vs. Module
Configuration Options
When creating a module you have the following options:
Title: Module nameApplication menu: Under which application module appearsOrder: In increments of 100's defines order of Modules underneath Application menuHint: Shown to user when hovered over moduleRoles: Restrict module access to specified rolesActive: Defines whether module appears in "All" menuOverride application menu roles: Roles here grant access to users who are not authorized to access the application menuLink Type: Type of link for module. Separator is used to create "Application menu" in "All" Menu.Table: Name of table this module is part ofView name: Specifies the view in which module opensFilter: Used for lists. Speficies filter.
ServiceNow Product Documentation - Module Link Types
Use Application scope
The first decision in a development process according to best practice should be whether to put the application in a private scope or global scope
Private Scope
- Default behavior
- Private application scope
- Only applications in same scope have full access to create, modfiy and remove or run application data
- can use source control (git / company registry)
- can use delegated development (for non-admin users)
Global Scope
- Can not integrate with source control
- Can not use delegated development
Only create if:
- ... application has to delete global data
- ... application needs change appplication access settings on multiple default tables to function
- ... application needs access to APIs only available in global scope. Creating a globally scoped passthrough script (bypass measure by passing functions calls to Global-only APIs) would not meet this requirement.
Application User Interface
Create, design, and customize forms
To customize form views you have multiple options:
Form Layout
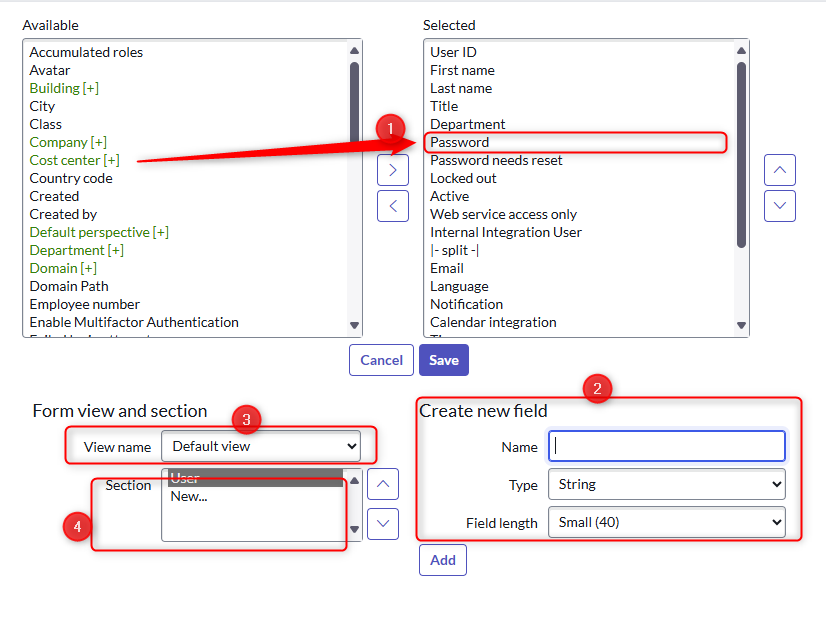
- [1] Add Field: Click Arrow to the right to add a Field to the current View [3] and current Section [4]
- [1] Remove Field: Click Arrow to the left to remove a Field from current View and current Section
- [4] Add Section: Click on "New..."
- [2] Create new Field: Fill out and create a new Field on the table (automatically added to form and first section)
Form Designer
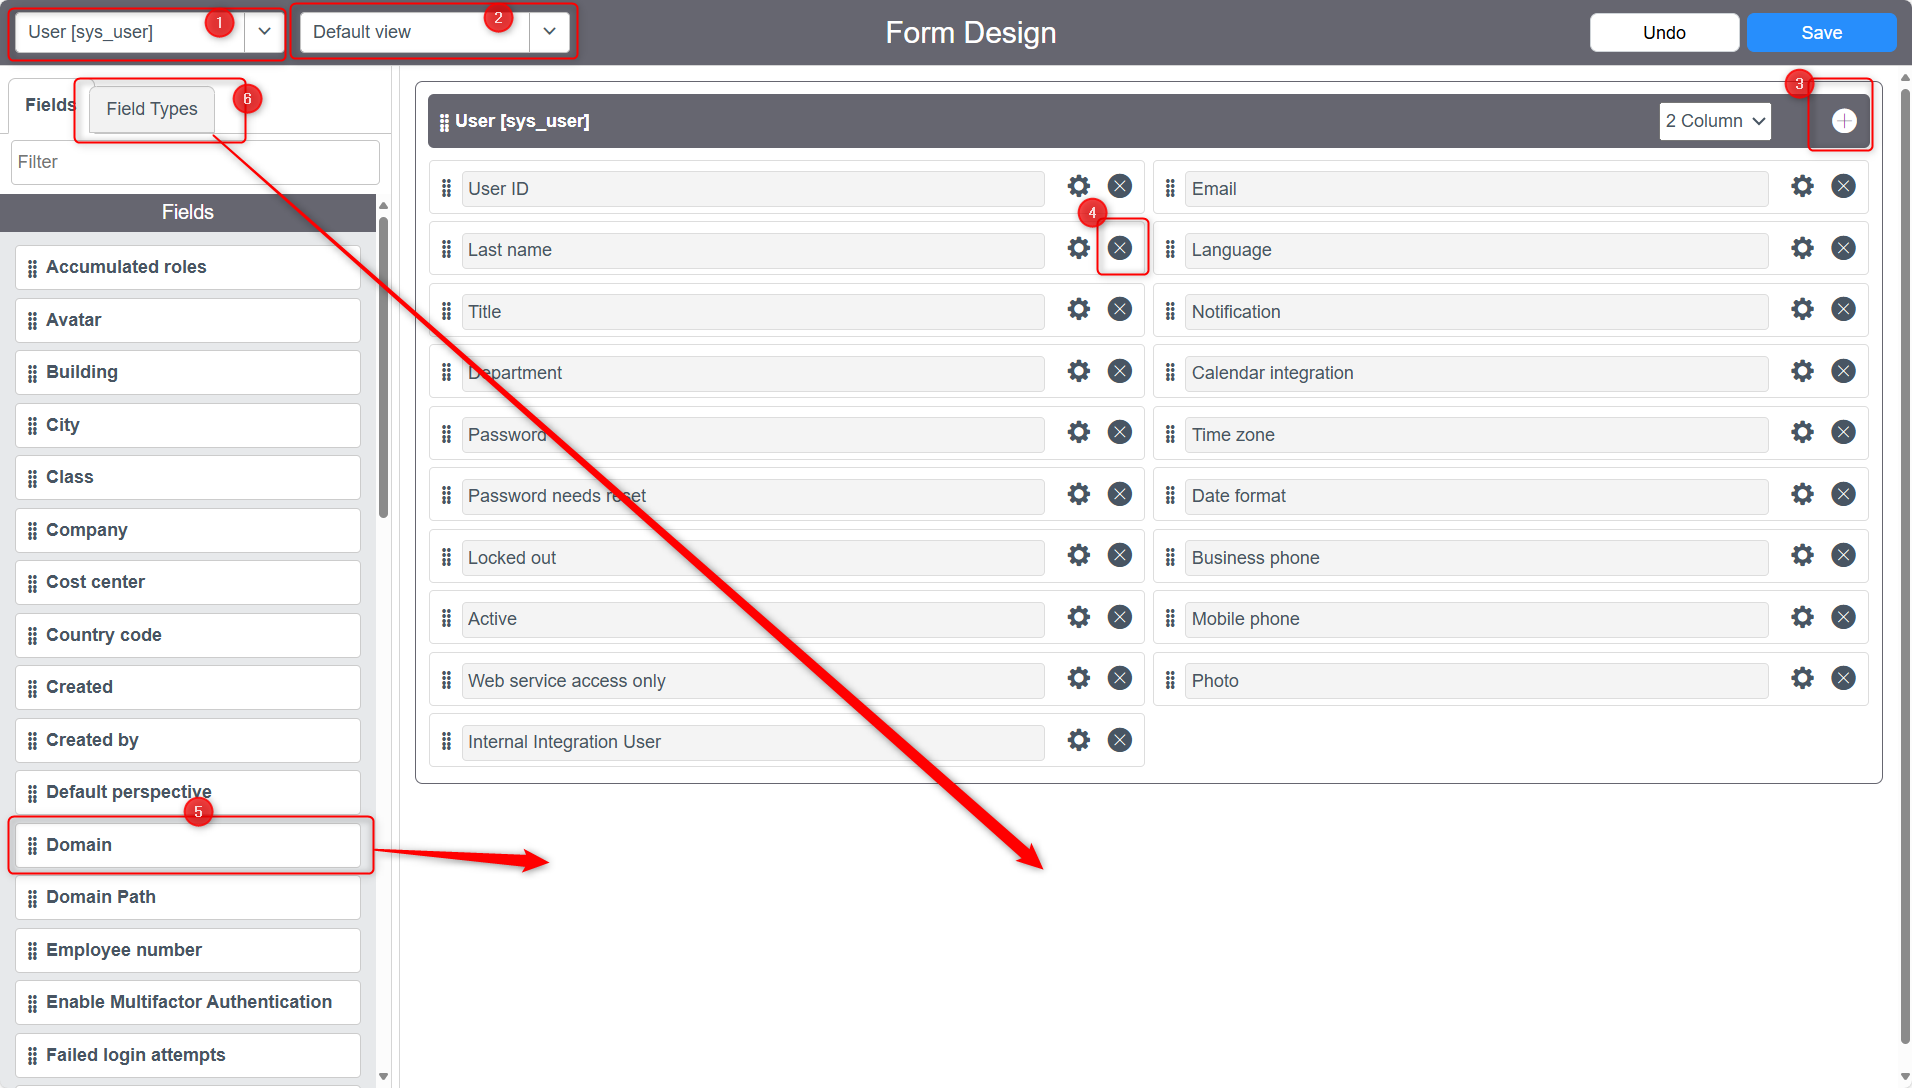
- [1] Current Table
- [2] Current View
- [3] Create new Section
- [4] Remove Field from Section and View
- [5] Drag onto Section to add existing Field
- [6] Drag Field Type onto Section to create a new field (change name by clicking on Settings icon)
Form Builder
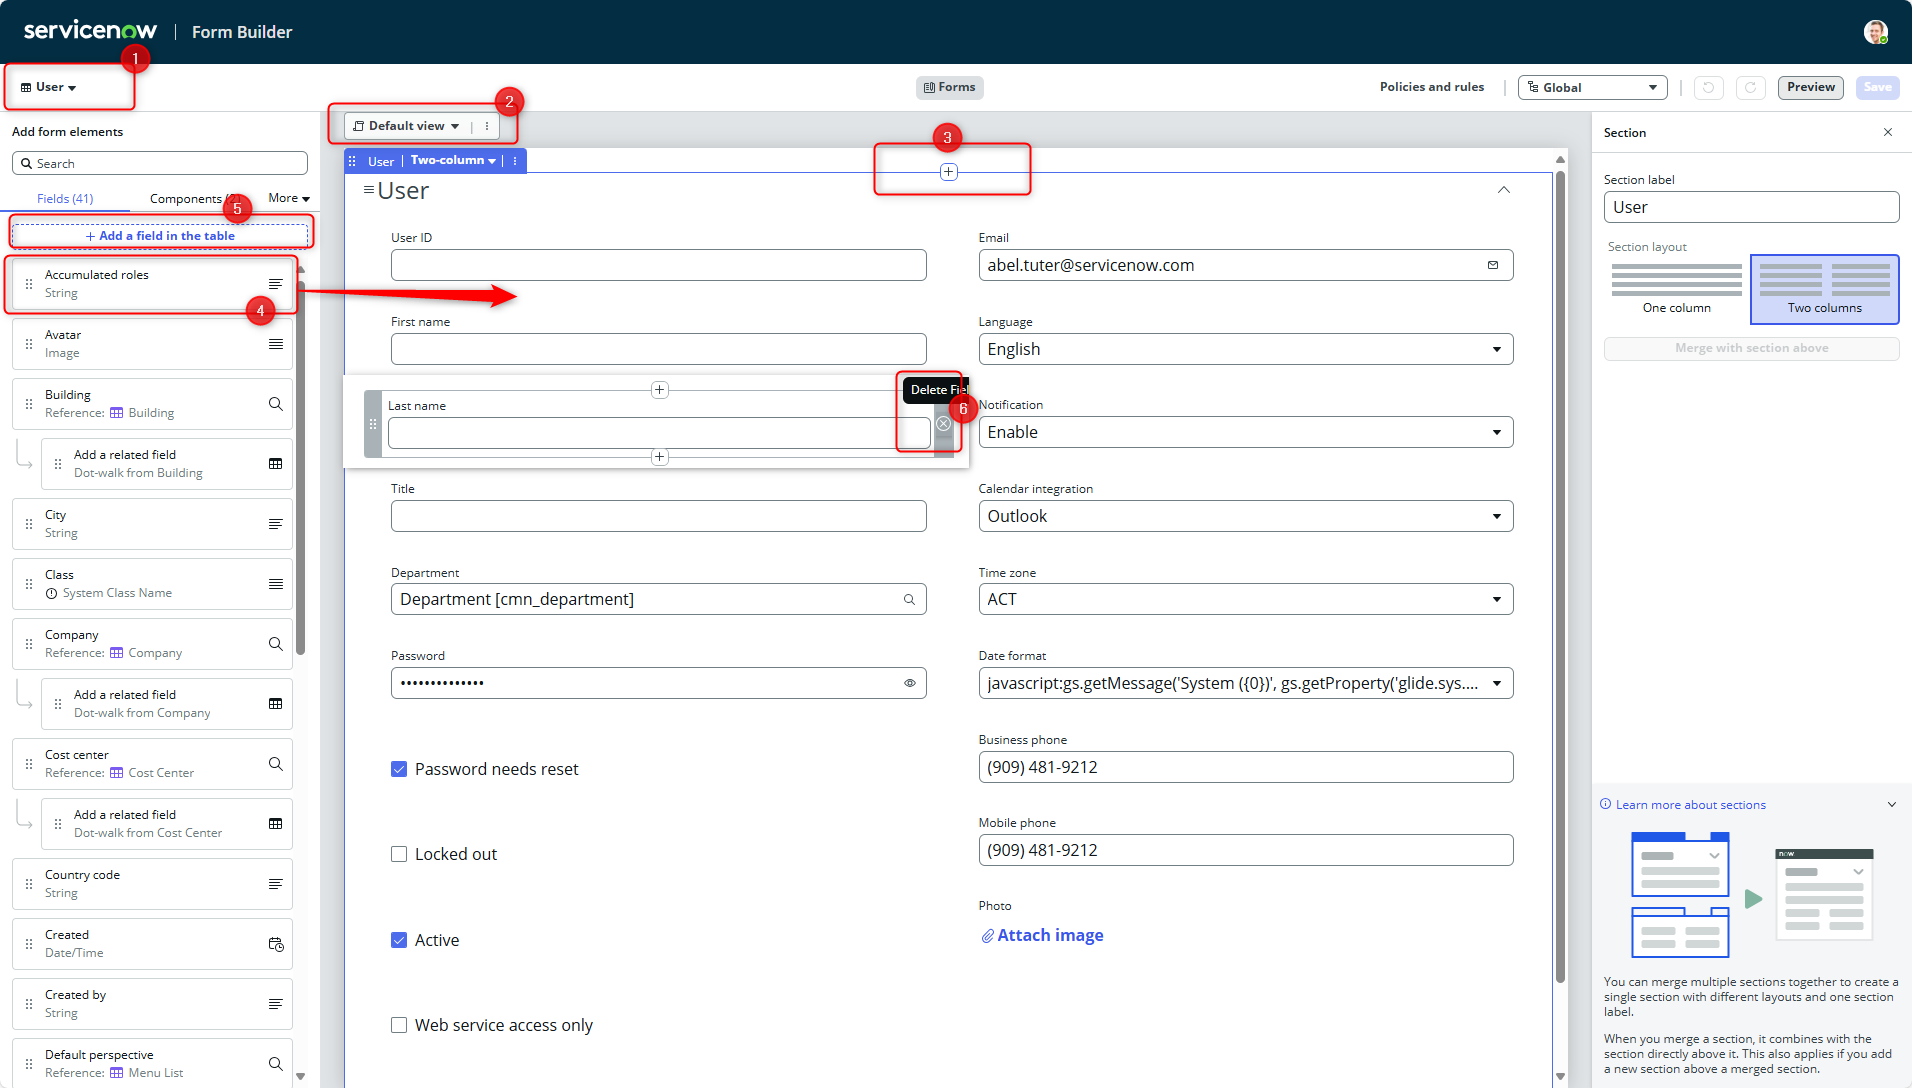
- [1] Current Table
- [2] Current View
- [3] Create new Section
- [4] Drag onto Section to add existing Field
- [5] Click to open popup, to create new field on table
- [6] Click "Delete Field" to remove from Section
Write, test, and debug client-side scripts for desktop
- Open the Browser Console and Inspect Script, Debug
Write, test, and debug server-side scripts
- Debug Log:
System Diagnostics > Debug Log- displays gs.debug(), gs.info(), gs.print() and gs.log() statements as well as server logging information
- Debug Business Rule:
System Diagnostics > Debug Business Rule- messages indicate which business rules are being run and when they are started (==>), finished (<==), or skipped (===)
- Debug Security Rules:
System Security > Debug Security Rules - Stop Debugging:
System Security > Stop Debugging- disables all debugging processes
Use a Record Producer as an application's UI
Record producers use the Catalog Item user interface to create records in application-specific tables.
Creating a record producer from Table
- Configure a table, under related links
- Click on "Add to Service Catalog"

This opens a popup from which you can select fields to create a record producer for this table's records.
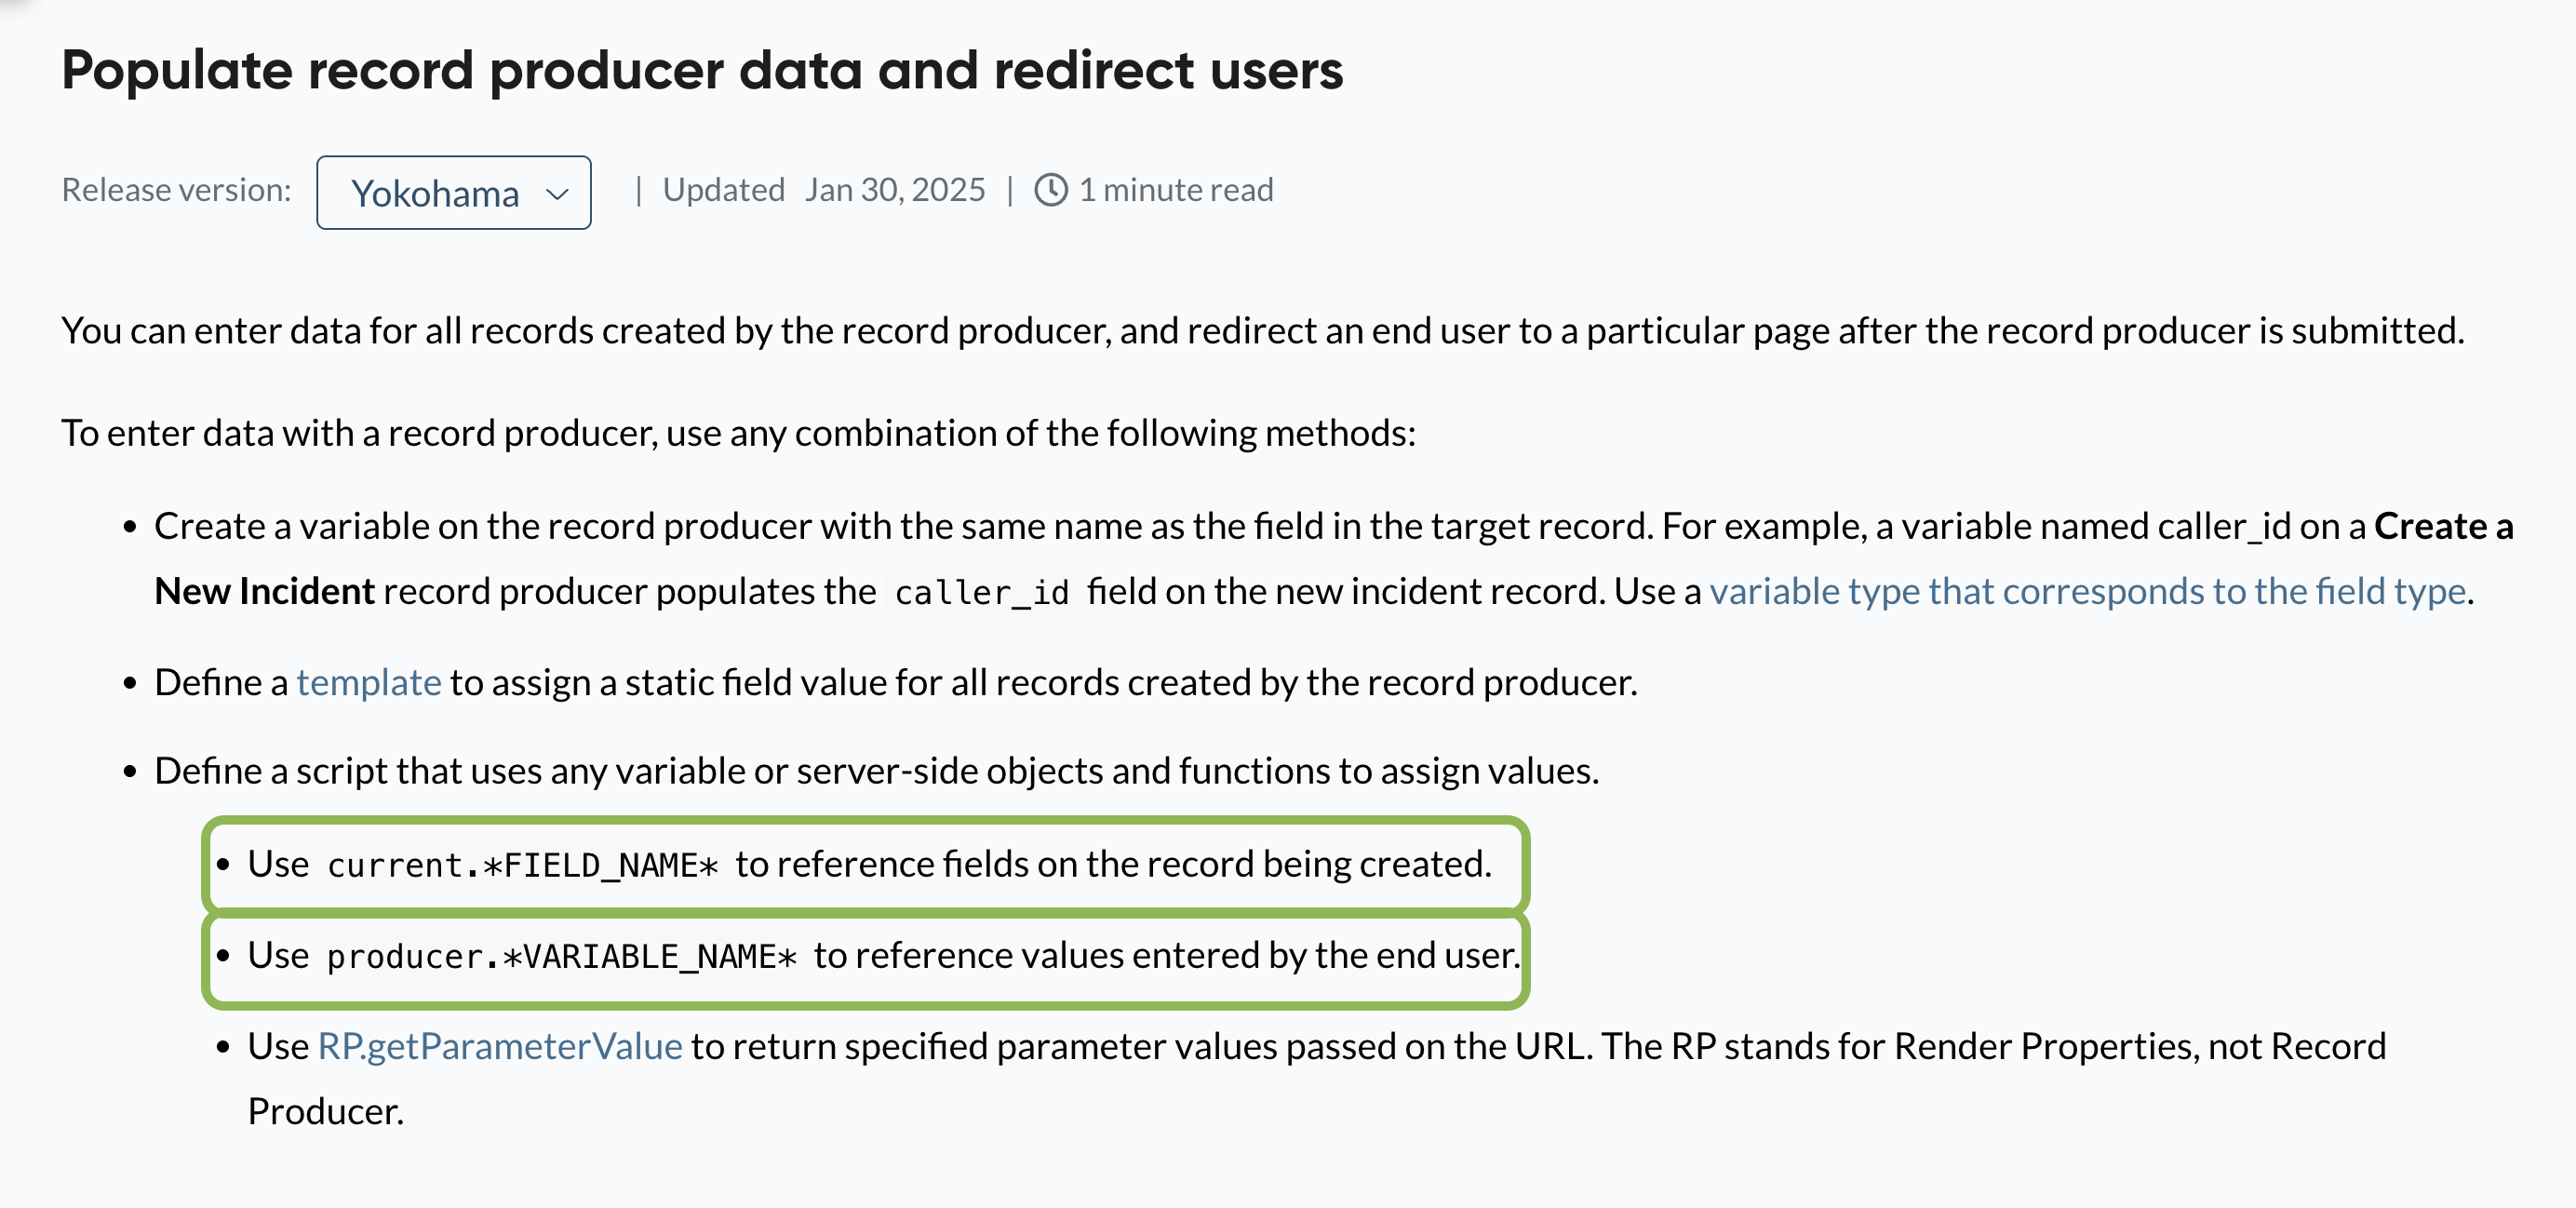
Poplate record producer data and redirect users
Security and Restricting Access
Restrict access to applications and application modules
- Application Menu:
- Go to System Definition → Application Menus or Studio → Application Explorer → Navigation → Application Menus → [Your App].
- Click Edit roles and assign only the roles permitted to view the application. Users without those roles won’t see it .
- Application Module:
- Navigate to System Definition → Modules or via Studio → Application Explorer → Navigation → Modules → [Module].
- In the Visibility (roles) field, add the roles that should have access. Users without those won’t see the module (
Manually and automatically create, test, and debug Access Controls
- Create ACLs
- Manually
- With the
security_adminrole you can elevate yourself - Now create ACLs
- With the
- Automatically
- When creating a table you can select a checkbox and ACLs are created
- Manually
- Test ACLs
- Impersonate as User and access a table / record / field
- Or use "Access Analyzer"
- Or use "Debug Security Rules" Module
- Debug ACLs
- Same as above
Debug Security Rules Output
| Icon | Description |
|---|---|
| A green checkmark (Green checkmark) | Indicates the table or field passed the criteria. |
| A red x icon (Red x icon) | Indicates the table or field did not pass. |
| An empty gray circle icon (Grey circle icon) | Indicates the ACL evaluation did not need to be performed. |
| A blue checkmark, x, or empty circle | Indicates that the ACL was taken from a cached result of a previous ACL check. The icons mean the same as the above. |
ACL Execution Order
- From most specific (field), to most generic (record)
- If a user fails a table ACL rule, the user is denied access to all fields in the table, even if the user passes a field ACL rule.
- If a user passes a table ACL rule, but fails a field ACL rule, the user cannot access the field described by the field ACL rule
- Order in General: Table evaluated first, then field
- Order in ACL: Roles, Condition, Script
Use GlideSystem methods to script security
Important methods:
- Server-Side: GlideSystem (gs)
- getUser()
- getUserID()
- getUserName()
- hasRole()
- isLoggedIn()
- isInteractive()
- getSession()
Other Scripted Security Methods
The client-side GlideUser (g_user) API has these methods:
- hasRole()
- hasRoleExactly()
- hasRoleFromList()
- hasRoles()
The client-side API methods can be used in any client-side script, such as Client Scripts and UI Policy scripts. Client-side security is the easiest security to break. Do not depend on client-side scripts to secure sensitive data.
The server-side GlideSystem (gs) API has these methods:
- getUser()
- getUserID()
- getUserName()
- hasRole()
- isLoggedIn()
- isInteractive()
- getSession()
The server-side GlideElement API has methods to check whether a user's role allows them to access the associated GlideRecord(s):
- canCreate()
- canRead()
- canWrite()
Use Application Scope to protect application artifacts
Application design and runtime
- JavaScript Mode: Configurable which JavaScript version the scope supports (ES2021 / ES5)
- Runtime Access Tracking:
- None: Automatically accept all requests for cross-scope resources, without logging
- Tracking: Automatically accept all requests for cross-scope resources, with logging
- Enforcing: Manual authorization by an administrator for cross-scope requests, with logging
- Restrict Table Choices: Restrict which cross scope tables can be seen by the application
Important: After installation, the system no longer tracks new runtime access requests. Only during development.
Runtime access requests / grants are stored in related list "Cross-scope privilege"
Table design and runtime
Records:
- Accessible from: All application scopes / this application scope only
- Can read:
- required for all other options to be available
- Allow other applications to read from this table
- if this + accessible from --> Other Applications can create Business Rules
- Can write
- Allow other applications to write values to this table
- Can create
- Allow script object from other applications to create records on this table
- Can delete
- Allow script object from other applications to delete records from this table
- Allow access to this table via web services:
- Allow inbound webservice queries on this table. User still needs correct permissions. Even without checkbox.
Configuration:
- Allow configuration:
- Accessible from needs to be set to "All application scopes"
- Allows applications in other scopes to create the following on this table:
- Business Rules
- UI Actions
- Client Scripts
- Add fields (extended fields are in different scope)
Script protection policy
You can protect your script with the following options:
- None: Allow other application developers to customize your script
- Read-only: Allow other application developers read-only access
- Protected: Prevent other application developers from access and customization
Important: This is only enforced on instances where application not developed, and for Store-Apps. For all others you can just remove the Protection Policy.
Application Automation
Write, test, and debug Workflow and Flow Designer
Flow Designer enables process owners to automate work by building multi-step flows from reusable components without having to code. Workflows handle business process automation with drag-and-drop functionality, while Flow Designer provides a modern no-code approach for creating automated processes with actions, triggers, and data flow management.
Create and use Application Properties
Application properties are used to set application parameters and change application behavior dynamically. These are configuration settings that allow developers to create customizable variables for applications, enabling runtime behavior modifications without code changes.
- Flow-Designer: Testing a flow which modifies data has no option of rollback.
Create Events, Scheduled Script Executions (Scheduled Jobs), and Utils (application) Script Includes
Events trigger automated responses to system changes. Scheduled jobs operate in the background via worker and execute scripts at predetermined times or intervals. Script Includes contain reusable server-side JavaScript functions that can be called from other scripts throughout the application.
- Events: Register Event, generate event, handle event
- Event Handlers: Email Notification, Script Action (Script executed when event)
- Schedule Script Execution: Available Classes are GlideRecord and GlideSystem (of course more). But no current object
Send and receive email
Applications can process incoming email and send notifications ServiceNow Developers. This involves configuring email notifications, creating inbound email actions to process incoming messages, and using notification records to send automated emails based on system events.
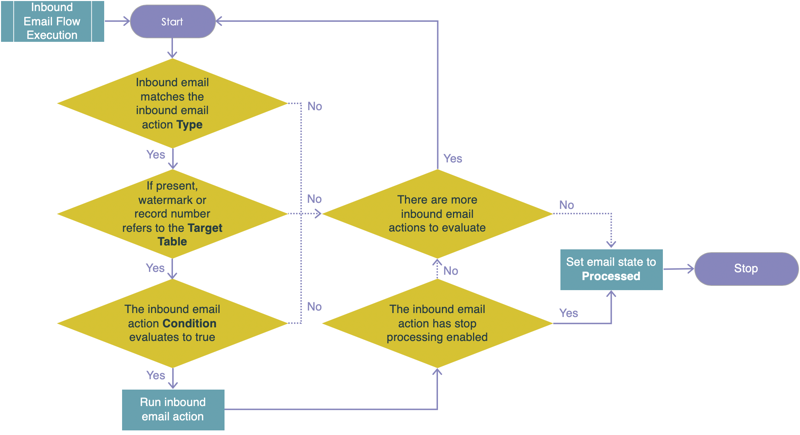
- Inbound Email
- In Script has these options: current, email, event
- Inbound email flows take priority over scripts
- User matching:
- By email address
- if no user found ->
- Inbound Action
- if from untrusted domain, or user not matched impersonates guest user
- if user locked out inbound action fails
- otherwise if user exists impersonates that user
- Email will be moved to Junk Folder if
- Email ignored: If an email is ignored, it will be sent to the junk folder.
- Email not in Trusted Domains: If the email domain is not added in the Trusted Domains field in Email Properties.
- Inbound email action: If the message is ignored by an inbound email action.
- SPAM protection: If the email headers have "X-ServiceNow-Spam-Flag:YES", it indicates the email may be spam.
- Email Filters: Enabling the email filter plugin brings filters like Ignore header, Ignore sender, Ignore subject, and Move to Junk.
- Email sender passed: This sender, along with the user being locked out or inactive, can cause emails to end up in the Junk folder.
- Outbound Email
- triggered by event
- triggered by condition on table
- weight - only email with highest weight is sent if
- .. they have same target table and recipients
- default weight = 0 (email always sent if condition met)
Design and create homepages and reports
Homepages provide customized dashboards with widgets and performance analytics for users. Reports generate data visualizations and summaries from ServiceNow tables, allowing for scheduled distribution and real-time monitoring of application metrics and KPIs.
- Gauge: Visualization component on homepage
Working with External Data
Import data in CSV or Excel format
- Use the "Load Data" module
- This creates a System Import Set
- You can then use Transform Maps to map imported columns to preexisting columns in servicenow tables
If the fields in import and target table are the same (or at least some) you can use "Auto map matching fields" on Table Transform Map related links. This will create mapping records for all the fields withe the same names.
Integrate to, including testing and debugging, an external data source using REST
- Create REST Message (Base) and Endpoint (URL)
- Create Request action: Like another action in Workflow Studio but specifically for REST Messages
- Create Data Source in Module:
All > System Import Sets > Administration > Data Sourcesfrom type RESt - Configure Data Source options like parsing and data xpath
Or more modern would be to use a "Data Stream" action, which is essentiall the same :)
Testing
Either manually
or with ATF
- has no Test-Step limit
Managing Applications
Download and install applications
Applications can be retrieved:
- ... from the Store
- ... from Company Registry
- ... via Update Set
Store
- Entitle in Store
- Install in Application Manager
Company Registry
- Go to "My Company Applications"
- Install a specific version
Update Set
- Retrieve / upload update set
- Apply
Use Delegated Development to manage source code and code review
Delegated Development
Add developers (non-admins) or groups which can develop and/or deploy the application.
Important: Developer permissions are available only for scoped apps, not global apps.
These granular permission can be defined for each developer/group:
Developer Permissions
- Delete Application: Allows deletion of scoped applications.
- Source Control: Grants full access to source control.
- All File Types: Access to all application file types, similar to admin role with limitations.
- Playbooks: Access to create processes in the Playbooks design environment.
- Integrations: Access to web service APIs and Integration Hub.
- Reporting: Access to reports and scheduled reports.
- Notifications: Manage automatic email notifications.
- Decision Tables: Create decision logic with multiple rules.
- Mobile Builders: Access to mobile app builders.
- UI Builder: Create pages for experiences.
- Workflow: Access to Workflow Editor and Activity Creator.
- Service Catalog: Manage catalog-related file types.
- Service Portal: Access to Service Portal tools.
- Workflow Studio: Create flows and actions.
- Tables & Forms: Manage model and layout file types.
- Manage ACLs & Roles: Access to security-related file types.
- Allow Scripting: Write access to script fields.
- Manage Collaborators: Invite and manage users/groups.
- Delegated Admin: Access to all delegated development permissions.
Deployment Permissions
- Upgrade App: Permission to upgrade installed applications.
- Publish To Update Set: Publish applications to update sets.
- Publish To App Store: Publish applications to ServiceNow Store.
- Manage Update Set: Manage local and retrieved update sets.
- Publish To App Repo: Publish applications to the application repository.
- Submit for Deployment: Submit applications for review and deployment.
Team Development
Allows paralell programming with git-like source control between multiple servicenow instances. You develop on subprod-instances and push to a parent instance.
There Team Development administrators have the option to require peer review before changes applied.
Use the ServiceNow Git integration to manage source code
Allows developers to store source code and configuration records of an application in a git repository. On a git server.
- Actions possible in servicenow and on git-server: Create Branch
- Store local changes for later use: Stash
Coding
Angular.js
ng-if vs. ng-show
ng-ifwill remove elements from DOM. This means that all your handlers or anything else attached to those elements will be lost. For example, if you bound a click handler to one of child elements, whenng-ifevaluates to false, that element will be removed from DOM and your click handler will not work any more, even afterng-iflater evaluates to true and displays the element. You will need to reattach the handler.ng-show/ng-hidedoes not remove the elements from DOM. It uses CSS styles to hide/show elements (note: you might need to add your own classes). This way your handlers that were attached to children will not be lost.
Links
- Exam Blueprint - CAD Certification
- ServiceNow Developer - Professional Developer Guide for the Now Platform
- ServiceNow Developer - Create the NeedIt Application and Application Files
- ServiceNow Developer - Build my first application
- ServiceNow Product Documentation - Select user experiences in Guided Application Creator
- ServiceNow Community - Understanding Application Scope
- ServiceNow - Custom Table Guide
- ServiceNow - Data Encryption Whitepaper
- ServiceNow Product Documentation - Exploring Access Control List
- ServiceNow Product Documentation - ACL rule types
- ServiceNow Developer - Securing Applications against unauthorized access
- ServiceNow Product Documentation - Javascript engine feature support
- ServiceNow Product Documentation - Application access settings
- ServiceNow Product Documentation - Script protection policy
- ServiceNow Product Documentation - Access enforcement for ServiceNow Store apps
- ServiceNow Support - Email Notification -WEight
- ServiceNow Product Documentation - Matching Email to Existing User
- ServiceNow Support - Inbound Email moved to Junk Folder
- ServiceNow Product Documentation - Team Development - Code Review
- ServiceNow Product Documentation - Developer and deployment permissions
- ServiceNow Developer - What is Source Control
- ServiceNow Product Documentation - Create a REST (Integration Hub) Data Source